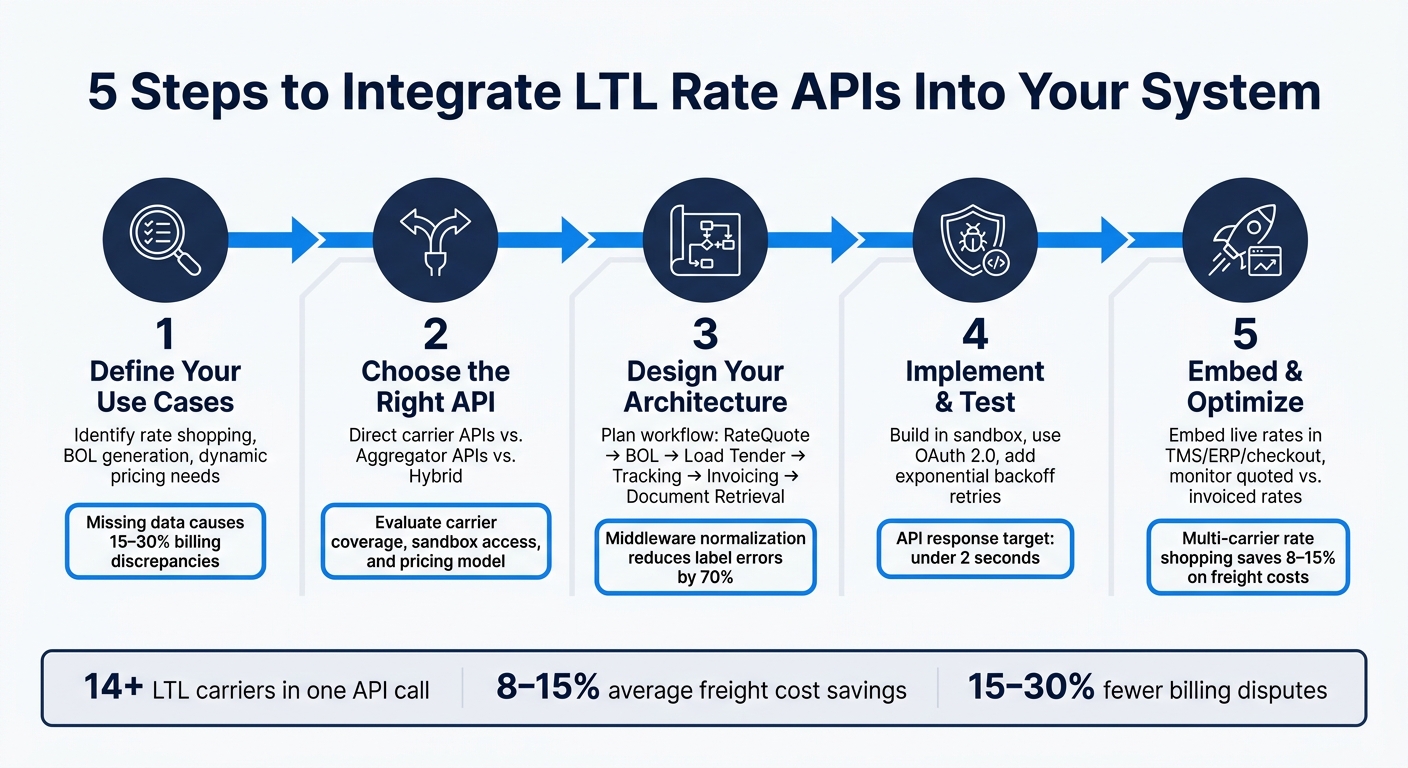
5 Steps to Integrate LTL Rate APIs into Your System
Automate LTL pricing and booking by integrating rate APIs in five practical steps to eliminate manual quotes and reduce shipping costs.

Tired of chasing freight quotes manually? Integrating LTL (Less-Than-Truckload) rate APIs can save you hours by automating rate comparisons, shipment booking, and document generation. Here’s how to do it in 5 simple steps:
- Define Your Use Cases: Identify what you need the API to do - rate shopping, dynamic checkout pricing, or automating Bills of Lading (BOL).
- Choose the Right API: Decide between direct carrier APIs for specific contracts or aggregator APIs for broader coverage.
- Design Your Architecture: Plan your workflow, from rate requests to tracking, and standardize your data schema.
- Implement and Test: Build, test, and debug your integration in a sandbox environment before going live.
- Embed and Optimize: Use live rates in your systems, compare carrier options dynamically, and monitor performance over time.
Quick Tip: Tools like ShipPeek simplify multi-carrier integrations, offering real-time rates from over 14 carriers, flat pricing, and a sandbox setup within 24 hours.
Ready to streamline your freight operations? Let’s break it down.
Step 1: Define Your Use Cases and Data Requirements
Before diving into the coding phase, take the time to clearly define your use cases and specify the data exchange requirements. Skipping this step can lead to frustrating integration issues later on.
Common Use Cases
One of the most common use cases is automating rate aggregation from multiple carriers. But that’s just the beginning. These APIs are also used for dynamic checkout pricing, internal rate comparisons, generating Bills of Lading (BOL) automatically, and scheduling pickups - all within a single platform.
Your specific use case will shape your integration approach. For example:
- A marketplace model allows access to a broad range of spot rates across many carriers, making it ideal for rate shopping.
- A direct carrier connection, on the other hand, uses your negotiated contracts, giving you more control over routing rules and performance tracking.
Defining your use case upfront ensures you know exactly what data you’ll need for a smooth and efficient integration.
Required Data Fields
Missing data can lead to costly billing errors. For instance, using estimated rates instead of live contract rates can result in 15–30% billing discrepancies for LTL shipments [9]. To avoid this, make sure every API request includes the necessary data from the start.
| Data Category | Required Fields | Why It Matters |
|---|---|---|
| Location | Origin/Destination ZIP, Address Type | Affects base rates and surcharges |
| Shipment Specs | Weight, Dimensions (L × W × H), Freight Class | Determines density-based pricing |
| Handling Units | Total Unit Count, Pieces per Unit, Sequence Number | Needed for tracking and label generation |
| Accessorials | Liftgate, Inside Delivery, Appointment, HazMat | Identifies additional service fees |
| Account Info | Carrier Account Number, Mailing Address | Retrieves your negotiated contract rates |
Manual processes often miss critical details like dimensions or accessorial flags (e.g., “residential delivery”), which can lead to inaccurate API responses [8][9].
Once you’ve identified the required data fields, the next step is to organize them into a structured, scalable format.
Building a Data Schema
Instead of mapping each carrier’s format individually, create a master schema that works with an aggregator API. This master schema acts as the backbone of your integration, ensuring your system aligns with the use cases you’ve already defined. It also makes scaling easier, allowing you to add carriers without reworking your data structure [5][9].
To ensure smooth API performance:
- Include a
sequenceNumberfor multi-piece shipments to link secondary units to the master unit [8]. - Plan for document retrieval by adding fields for
BILL_OF_LADING,DELIVERY_RECEIPT, andINVOICE. This allows your system to automatically fetch important shipping documents when needed [4]. - Enforce non-negative values for weight and dimensions before making any API call. This simple validation step can help prevent errors during both testing and production [8].
Taking the time to structure your data schema thoughtfully will save you from headaches down the road and set the stage for a successful integration.
sbb-itb-8138a00
Step 2: Evaluate and Select LTL Rate APIs
Once your schema is ready, the next step is choosing an API that aligns with your integration needs. Picking the wrong API can lead to unnecessary costs, wasted time, and avoidable frustration.
Types of LTL Rate APIs
LTL rate APIs generally fall into two categories: direct carrier APIs and aggregator APIs.
-
Direct carrier APIs: These connect you directly to a specific carrier, like FedEx Freight or Old Dominion. They use your negotiated contracts, giving you more control over routing and performance tracking. Plus, your shipment data stays within your own system. However, each carrier requires a separate integration, which can quickly make things more complex.
-
Aggregator APIs: These allow you to connect with multiple carriers through one integration. You get side-by-side rate comparisons, standardized tracking data, and broader lane coverage - all in a single API call.
Some shippers take a hybrid approach - using direct carrier APIs for their primary freight lanes while relying on an aggregator to fill in gaps or handle overflow [3].
API Evaluation Criteria
When assessing APIs, focus on your specific data and operational needs. Here are some key factors to consider:
- Carrier coverage: Check if the API supports the SCAC codes you depend on, such as ODFL, SAIA, XPO, and FedEx Freight [5].
- Endpoint capabilities: Look for an API that covers rating, booking, dispatch, tracking, and document imaging. Managing multiple fragmented endpoints can increase integration challenges.
- Sandbox environment: A test environment separate from production is crucial. It lets your team test requests and monitor response times before going live [5][10].
- Pricing structure: Understand the provider’s pricing model. Some offer à la carte pricing, charging per transaction, while others use a flat-fee model that provides predictable costs as your shipping volume grows [6].
“The all-inclusive, one-time fee model includes functions you need now and those you’ll want later as your business grows. The lack of per-transaction fees also allows you to leverage the software’s power without worrying about going over budget.” - Banyan Technology [6]
Also, ensure the API enforces contracted rate protection, so the spot rates returned won’t exceed your negotiated carrier contracts [6].
By evaluating APIs with these criteria, you’ll be better equipped to choose a solution that meets your needs.
ShipPeek LTL TMS Overview
ShipPeek LTL TMS offers a unified API for both LTL and truckload shipping. With just one API call, you can access real-time rates from over 14 LTL carriers, including major names like UPS and FedEx. This eliminates the hassle of managing multiple integrations [5].
ShipPeek supports the entire shipping process - rate requests, booking, label generation, and tracking - under a flat pricing model with no per-transaction fees. They also provide sandbox access within 24 hours of account setup, allowing your development team to start testing almost immediately [5]. Plus, they offer a 7-day free trial, with pricing starting at $999 (currently discounted to $749 for the first 3 months).
For teams looking to streamline their workflow and avoid building a data pipeline from scratch, ShipPeek significantly reduces the complexity of integration.
Step 3: Design the Integration Architecture
With your API chosen and the structured data schema from Step 1 ready, the next step is to figure out how everything fits together. A well-designed architecture ensures data consistency and supports smooth scaling as your operations grow.
Integration Workflow
Think of the integration as a multi-step pipeline. It starts with a frontend trigger - this could be a checkout page, quoting tool, or internal shipping dashboard. From there, the request flows through a middleware layer before reaching the carrier API. The middleware handles business logic, such as applying rate-shopping rules, setting free shipping thresholds, and choosing carriers based on service-level needs. Once confirmed, shipment data moves downstream to systems like your WMS, ERP, billing platform, or analytics dashboard.
Here’s how the LTL lifecycle typically unfolds:
| Step | API Action |
|---|---|
| 1 | RateQuote – Get pricing and transit times based on weight and dimensions |
| 2 | Bill of Lading (BOL) – Generate the legal shipping document |
| 3 | LoadTender – Submit the pickup request to the carrier |
| 4 | Tracking – Retrieve near–real-time status updates |
| 5 | Invoicing – Finalize billing and retrieve invoice PDFs |
| 6 | Document Retrieval – Access Proof of Delivery (POD) for archiving |
To keep your system efficient, implement webhooks for real-time tracking updates. This reduces server load and keeps your CRM and notification systems up to date without requiring extra API calls [11].
After setting up the workflow, the next step is to standardize and validate your data to ensure smooth operations.
Data Normalization and Validation
Standardizing inputs is key to avoiding errors. For example, weights should be in pounds, and dimensions in inches. Programmatic address validation at the entry point can eliminate manual corrections, and middleware-level normalization has been shown to reduce label errors by 70% [11]. Be sure to include an is_residential flag in your shipment object, as distinguishing between residential and commercial deliveries can significantly impact pricing.
For carrier identification, use Standard Carrier Alpha Codes (SCAC). These codes ensure consistency across your system - like odfl for Old Dominion, saia for Saia LTL Freight, and xpol for XPO Logistics.
Once your data is clean and consistent, it’s time to decide on the best architectural approach for managing rate requests.
Architectural Options
When it comes to managing rate requests, you have two main approaches, each with its own pros and cons:
| Feature | Direct | API Layer |
|---|---|---|
| Maintenance | High; requires updates for every carrier change | Low; carrier updates are handled by the provider |
| Rate-Shopping | Requires manual multi-call logic | Built-in; aggregates multiple carriers in one call |
| Data Format | Carrier-specific schemas | Unified, normalized internal schema |
| Speed to Value | Fast for a single-carrier proof of concept | Faster for multi-carrier scaling |
If you’re working with a single carrier on a high-volume lane, direct API calls might be the way to go. But as soon as you need multi-carrier rate shopping, the maintenance burden grows. Every time a carrier updates its schema, you’ll need to adjust your code.
An API layer, like ShipPeek LTL TMS, simplifies this complexity. Instead of managing separate logic for carriers like FedEx Freight (fxfe), Old Dominion (odfl), and Saia (saia), you can send one normalized request and get a unified response. To ensure a smooth rollout, test your workflow in ShipPeek’s sandbox environment before going live. For security, store API keys in a secrets manager rather than hard-coding them, and rotate them regularly [11].
Step 4: Implement and Test the Integration
Now that your architecture is finalized and your data schema is ready, it’s time to bring your plans to life. This is where all the preparation turns into actual working code - and where even small mistakes can cause big headaches if you’re not careful.
API Implementation Tasks
Start by securing your credentials through the official developer portal of the carrier. Use OAuth 2.0 to exchange your consumer key and secret for a temporary bearer token. These tokens often expire quickly - XPO’s tokens, for instance, last only 12 hours - so it’s essential to include automated token refresh logic in your implementation [2].
Next, create a reusable API client. This client should handle authentication, format requests properly, and parse responses efficiently. Your core rate service function should take in a standardized shipment object (based on the schema you designed in Step 1) and return key details like rates, transit times, and carrier information. By centralizing this logic, you’ll only need to update it in one place if a carrier changes its schema.
To ensure smooth operation, implement health-check calls to verify that carrier services are available before executing any business logic. Many LTL APIs provide specific /health-check endpoints to confirm the availability of services like Rating or Pickup Requests. This step helps prevent your system from sending requests during carrier outages [2].
Once the implementation is complete, focus on building robust error handling and thoroughly testing your integration.
Error Handling and Resilience
A reliable integration needs to handle errors gracefully. Start by addressing the common HTTP error codes returned by LTL carrier APIs:
400for bad requests401for authentication issues404for missing resources409for conflicts [2]
Each of these errors should be handled explicitly to ensure your system responds appropriately.
Additionally, account for rate limiting. Many carriers enforce request caps based on tiered plans. For example:
| Tier | Requests per Minute |
|---|---|
| Bronze | 5 |
| Silver | 20 |
| Gold | 50 |
| Diamond | 100 |
For temporary issues like timeouts or hitting rate limits, implement exponential backoff retries - wait progressively longer after each failed attempt (e.g., 1 second, 2 seconds, 4 seconds). For critical workflows, like booking shipments, consider adding a fallback carrier to ensure a single API outage doesn’t disrupt operations entirely.
Testing Strategy
With error handling in place, it’s time to test your integration thoroughly.
Begin by running all API calls in a sandbox environment before moving to production [5]. When testing live endpoints, always use test mode flags (e.g., testMode=Y) to avoid triggering real-world actions like dispatching trucks [2].
Use specific test codes such as TEST, WARN, and FAIL to systematically validate different scenarios [12]. Work with realistic shipping data to ensure accuracy - think along the lines of a 500 lb. pallet shipping from Chicago, IL to Dallas, TX, complete with liftgate accessorials.
Integrate your API tests into a CI/CD pipeline using tools like Postman CLI or Jenkins. This setup ensures that every code change triggers a regression test suite, catching potential issues before they reach production [13]. Keep an eye on response times during these tests - LTL rate APIs should ideally respond in under 2 seconds to maintain a smooth user experience [9].
Step 5: Embed and Optimize Rates in Your Workflows
Once your integration is tested and running smoothly, the next step is to weave these rates into your everyday workflows. This involves embedding live rates into your systems and maintaining their performance over time.
Embedding Rates into Systems
LTL rate APIs make it possible to display pricing directly within the tools your team uses daily. For example, on an e-commerce checkout page, a rate call can instantly return multiple, accurate carrier options. In systems like TMS or ERP, the same API can automatically fill in rate fields when creating a shipment record, removing the need for manual data entry.
To make this work seamlessly, map the API response to your user interface using a standardized data schema. For instance, a checkout widget might show the carrier name, transit time, and cost, while a TMS could display detailed accessorial information. By maintaining a consistent data layer across all systems, a single API call can power multiple interfaces.
Once rates are embedded, focus on refining how they’re presented by leveraging dynamic comparisons.
Dynamic Rate Comparison
If you rely on just one carrier’s rates, you’re not taking full advantage of what an API can offer. Instead, request rates from multiple carriers, then sort them by transit time and cost while including any necessary accessorials.
It’s also helpful to filter options by service level. For example, separate priority services from standard or economy tiers, and rank rates within each category by cost. This ensures that low-cost options don’t compromise delivery timelines. Additionally, consider running comparisons between LTL and parcel shipping, as the cheapest choice isn’t always the most practical. Businesses using multi-carrier rate shopping through a TMS often see freight costs drop by 8–15% [9].
Make sure to include all required accessorials in your initial rate request. Adding them later can lead to higher charges than what the carrier will actually bill [10][1].
“SMC³’s LTL API solutions instill confidence in our ability to optimize performance and service to our customers. Because of our partnership, we are now able to rate 100% of our LTL carriers via API. When APIs work and the data can be trusted, it’s a game-changer.” - Dianna Giltner, Director of Operations, Express Logistics, Inc. [7]
Monitoring and Optimization
Going live is just the start. Rates and tariffs change over time, so regular monitoring is crucial. A solid strategy involves tracking the full shipment lifecycle - from the initial RateQuote response to BOL Generation, Load Tender, Tracking, Invoicing, and Document Retrieval. Keep an eye on responses just like you did during testing. By automatically comparing quoted rates to final invoices, you can quickly pinpoint discrepancies. This is critical, as estimated rates contribute to 15–30% of billing disputes on LTL shipments [9].
Tools like ShipPeek LTL TMS make this process easier by providing normalized rate data from major LTL carriers like Old Dominion (ODFL), XPO Logistics, Saia LTL Freight, and FedEx Freight. With unlimited API requests starting at $150/month [9], ShipPeek offers centralized shipment history, allowing you to filter by carrier, lane, or date range to spot performance trends. Use your sandbox environment to test new business rules or carrier integrations before rolling out updates to production, ensuring smooth operations without disruptions to your rating system.
Conclusion
The five-step integration process - defining your use cases, evaluating the right APIs, designing a robust architecture, implementing and testing thoroughly, and embedding rates into daily workflows - lays the groundwork for a logistics system that moves beyond outdated manual processes into a streamlined, automated future.
By eliminating the need for spreadsheets and email-based quoting, your team can dedicate more time to high-value tasks like strategic planning. Tools like ShipPeek LTL TMS make this transformation possible by simplifying freight management.
ShipPeek LTL TMS aggregates real-time rates from over 14 LTL carriers, including Old Dominion, Estes Express Lines, Saia LTL Freight, XPO Logistics, and FedEx Freight, into a single API call [5]. With a sandbox environment ready within 24 hours of account setup and the ability to make your first API request in less than 5 minutes, the platform removes many of the typical hurdles associated with integration [5]. Pricing starts at $749/month for three months, offering unlimited rate requests with no per-shipment fees.
As the U.S. freight industry continues to transition from legacy EDI systems to modern API-based solutions [3], the steps outlined here provide a clear and repeatable roadmap to help you embrace this shift and refine your operations over time.
FAQs
What data do I need to get accurate LTL rates?
To get precise LTL rates, you'll need to provide specific shipment details that carriers rely on for pricing. These include: - Origin and destination: Include the full addresses or zip codes for both. - Weight and dimensions: Provide the exact size and weight of the freight. - Freight class or service level: This can influence the rate significantly. - Accessorial requirements: Mention any special services or handling needs. - Carrier account details: Share your account number and mailing address. Supplying this information helps ensure accurate rate estimates.
Should I use a direct carrier API or an aggregator API?
When deciding between a direct carrier API and an aggregator API, it all comes down to your specific needs. An aggregator API, such as ShipPeek, combines rates from various carriers into one platform. This makes integration easier and allows for quick rate comparisons, booking, and tracking - all in one place. On the other hand, direct carrier APIs provide more control over individual carriers but often require separate integrations for each, adding to the complexity. For most businesses, aggregator APIs tend to be the more efficient option. They offer a broader range of carrier access and streamline real-time rate management, saving both time and effort.
How do I prevent rate and invoice mismatches after go-live?
To avoid rate and invoice mismatches after go-live, it’s crucial to perform detailed testing and validation. Start by reconciling carrier invoices with your TMS to confirm that charges correctly match specific shipments. Use sample shipments to validate rates across carriers, paying close attention to factors like surcharges, fuel adjustments, and dimensional weight calculations. Regularly compare real invoices against your system and establish a pass/fail threshold for rate accuracy. This helps identify and address discrepancies early on.