Checklist for LTL API Integration Success
Step-by-step checklist to plan, build, test, and monitor LTL API integrations, covering data prep, security, testing, and go-live.

LTL API integrations can transform your shipping operations - but only if implemented correctly. Up to 40% of TMS implementations fail, often due to integration issues. This guide provides a step-by-step checklist to ensure success, covering preparation, technical setup, testing, and long-term improvements.
Key Takeaways:
- Set clear goals: Define measurable objectives like reducing manual tasks or enabling real-time tracking.
- Prepare data: Audit product dimensions, weights, and addresses to prevent shipment errors.
- Prioritize security: Use modern authentication (e.g., OAuth 2.0) and validate compliance upstream.
- Test thoroughly: Use real data, simulate errors, and stress-test API performance.
- Monitor post-launch: Track metrics like API uptime, webhook success, and rate accuracy.
By following this structured approach, you can minimize errors, improve efficiency, and maintain smooth shipping workflows over time.
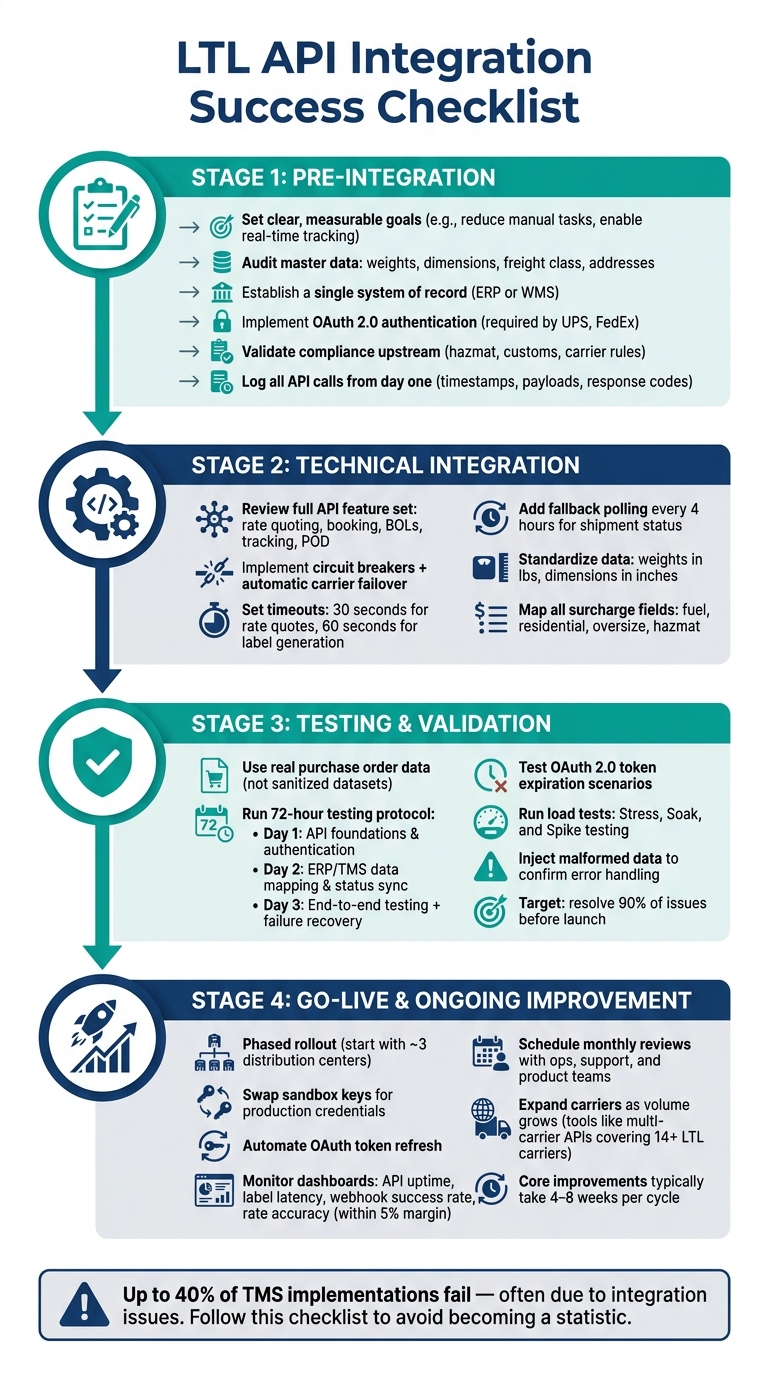
Pre-Integration Checklist: What to Do Before You Start
Jumping into an LTL API integration without proper groundwork can lead to setbacks. The steps you take before writing even a single line of code - like setting clear objectives, cleaning up your data, and addressing security needs - will play a big role in how smoothly your go-live process unfolds.
Setting Clear Goals and Scope
Start by defining specific, measurable goals. Vague objectives won’t guide you effectively when tough decisions arise. Instead, focus on clear targets, such as reducing per-shipment handling time, eliminating manual rate lookups, or offering customers real-time tracking updates via SMS or email.
Establishing the functional scope early is just as important. Will the API only handle rate quoting, or will it also include booking, document retrieval (like BOLs, PRO numbers, and labels), and freight auditing? Deciding this upfront helps avoid scope creep. Additionally, evaluate your pricing model - transactional fees can add up quickly compared to a flat-fee structure [2].
Another critical consideration is data ownership. If you connect directly to carriers, you retain full control over your shipping data. However, using a third-party marketplace may transfer ownership of that data to the platform [3]. Decide what’s best for your business before making a commitment.
Once your goals and scope are in place, the next step is ensuring your data is accurate and consistent.
Preparing Master Data and Data Standards
Accurate and reliable data is the backbone of a successful API integration. Before you connect systems, audit your product master data. This includes weights, dimensions, freight class, and addresses - all of which need to be consistent and correct across your platforms. Carriers often reject or reclassify shipments when dimensional weight data doesn’t align with the actual shipment, leading to delays and unexpected charges [1][5].
To avoid these issues, follow this practical rule: establish a single system of record. Whether it’s your ERP, WMS, or another platform, one system should serve as the authoritative source for shipping addresses, package specifications, and label statuses. Additionally, integrate tools like address validation, autocomplete, and geocoding into your data entry process. These tools can catch errors early, preventing failed deliveries and expensive reshipments.
With your data in order, the next focus should be on compliance and security.
Compliance and Security Requirements
Strong security measures are non-negotiable in modern API integrations. For example, UPS now requires OAuth 2.0 for all API transactions, and FedEx has transitioned completely to RESTful APIs, retiring its older SOAP-based Web Services [1]. If your integration plan still relies on outdated access key-based methods, you’ll need to update it before moving forward.
Beyond authentication, compliance checks should happen upstream - before execution. Hazmat restrictions, required customs documentation, and carrier-specific service rules should all be validated within your system, not at the loading dock [6]. As Maureen Milligan, Director of Operations and Projects at G10 Fulfillment, explains:
“Predictable compliance makes execution boring. In logistics, boring is efficient.” [6]
Finally, ensure that all API calls are logged from day one. Include timestamps, request payloads, and response codes in your logs to simplify troubleshooting later [1].
Technical Integration Checklist: Building the Connection
Once pre-integration preparations are complete, the next step is establishing a dependable API connection. Even small missteps during this phase can lead to costly production issues.
Reviewing API Features and Documentation
Before diving into coding, take time to understand the API’s key functionalities. While rate quoting and shipment creation are fundamental, many LTL APIs offer additional features. Look for capabilities like pickup scheduling and cancellation, real-time tracking at the handling unit level, and tools for generating documents such as BOLs, thermal labels, and Proof of Delivery (POD).
Pay close attention to API documentation. For instance, FedEx LTL APIs have specific constraints: they limit handling units to 200 for individual label printing and around 40 for batch processing [4]. Missing these details early can lead to expensive adjustments later. Additionally, confirm that your LTL account is enabled for API access. FedEx requires LTL-specific account activation and a verified mailing address before transactions can proceed [4].
Don’t overlook accessorial fees like hazmat charges, residential delivery, or inside delivery. Ensuring these are supported upfront will save headaches during implementation.
Once you’ve outlined the API requirements, shift focus to building a strong integration architecture.
Integration Architecture and Connectivity
A well-thought-out architecture ensures that minor carrier issues don’t escalate into widespread system failures. Two critical design elements to prioritize are circuit breakers and fallback polling.
Circuit breakers help isolate carrier API failures [1]. Pair them with automatic failover mechanisms so shipments can be rerouted seamlessly if a primary carrier’s API goes offline. For shipment status updates, rely on more than just webhooks. Carrier webhooks are prone to failure, so implement a fallback polling system that checks shipment statuses every four hours to keep your data accurate [1].
Timeout settings are equally important. Use 30-second timeouts for rate quotes and 60-second timeouts for label generation to prevent system delays during high-demand periods [1]. These timeouts account for the faster response times of quoting calls compared to the heavier processing needed for document generation.
Data Mapping and Field Transformation
Once connectivity is established, focus on standardizing and streamlining your data flows. Start by converting weights to pounds and dimensions to inches, and document these rules so they’re consistently applied by all team members [5].
Ensure there’s a single source of truth for shipping addresses, package details, and tracking events. Discrepancies between systems - like an ERP and WMS - can cause the API to reject requests or process them incorrectly. Beyond the basics, make sure your field mapping includes cost-related details like fuel surcharges, residential delivery fees, and oversize rules. As Orderbox notes:
“If your integration does not expose or normalize these fields [surcharges and fees], you may underestimate true shipping cost and choose services that look cheap but perform poorly.” [5]
Also, plan for exceptions. For example, what happens if an order changes or gets canceled after a label has been created? Jordan Blake, Senior SEO Content Strategist at Orderbox, puts it succinctly:
“The fastest way to spot a weak shipping integration is to ask, ‘What happens when the label is created but the order changes?’” [5]
If your data mapping doesn’t address this scenario, make sure to build a solution before launching. With these steps in place, your integration will be ready for thorough testing and validation.
Testing and Validation Checklist: Confirming the Integration Works
Once you’ve established a solid architecture and adhered to proper data standards, the next step is rigorous testing. This process ensures the integration’s reliability and minimizes the risk of discovering issues after launch. A structured testing approach, much like data validation, can save you from costly post-launch problems.
Setting Up Test Environments
Testing with real purchase order data helps uncover issues like rejections or mismatches that sanitized datasets might miss [1]. For carrier-specific documents - such as BOLs, PRO numbers, and pickup confirmations - sandbox testing is essential to verify their accuracy [7].
Pay close attention to OAuth 2.0 token expiration. Token-related failures often surface hours or even days after launch when tokens expire for the first time [1]. Additionally, some features, like address validation and real-time tracking, require live API tokens to function, as sandbox tokens may not support these capabilities [8].
A practical way to approach this is through a 72-hour testing protocol:
- Day 1: Test API foundations and authentication on primary shipping lanes.
- Day 2: Focus on mapping data between your ERP/TMS and synchronizing statuses.
- Day 3: Conduct full end-to-end testing, including failure recovery and carrier failover.
This method can help identify and resolve up to 90% of potential issues before launch [1]. Once your test environment is set up, you can move on to verifying individual functions and complete workflows.
Functional and End-to-End Testing
Functional testing ensures that specific API calls - like rate quoting, shipment booking, and pickup scheduling - perform correctly under different conditions. End-to-end testing takes it a step further by examining the entire workflow, from the initial quote to final delivery tracking. This ensures data consistency across all systems involved [9].
For LTL integrations, multi-piece shipments (MPS) deserve special attention. These shipments assign a master tracking number to the first handling unit, with child tracking numbers for the subsequent units [4]. Error injection tests are also critical - they involve using malformed or incomplete data to confirm the system can handle bad inputs without crashing [9][10].
“Your TMS testing protocol determines whether you catch these problems before your customers do.” - Shipper-TMS [1]
Once functional accuracy is confirmed, it’s time to test the integration’s ability to handle high traffic and stress.
Performance and Load Testing
Functional tests ensure the integration works, but load testing confirms it can handle high usage. Three key types of load tests for LTL API integrations are:
- Stress Testing: Gradually increase the load until the system fails to identify breaking points.
- Soak Testing: Sustain high traffic over a long period to detect slow resource leaks.
- Spike Testing: Sudden traffic bursts to test the system’s ability to recover quickly [12].
To avoid unintended consequences - like generating real shipments or charges - run load tests in a dedicated sandbox with carrier-specific test flags [11]. Define response time SLAs (Service Level Agreements) ahead of time to set clear performance benchmarks. Pay extra attention to compute-heavy operations, such as HazMat documentation and multi-package label generation, as these require significantly more processing power than standard rate quotes [13].
“Identifying API performance issues in the initial stages, particularly before deployment, incurs significantly lower costs for an organization compared to addressing API downtime during production.” - LoadView [12]
Go-Live and Ongoing Improvement Checklist
With testing wrapped up, it’s time to focus on launching smoothly and ensuring everything runs at its best over time.
Go-Live Preparation Steps
Start with a phased rollout. Launch with a smaller group - perhaps three distribution centers - before scaling up fully [14]. This approach helps minimize risk if unexpected issues arise in production.
Double-check key settings before going live. Ensure production carrier configurations, insurance values, and automation rules are properly set up [15]. Swap out sandbox API keys for production credentials and automate OAuth token refreshes to avoid authentication problems [1][15]. Additionally, test that label printers and dimensioners are compatible with API-generated outputs. Hardware mismatches often cause last-minute headaches [15].
Keep a rollback plan on hand. Document every configuration and standard operating procedure [1].
“Documentation becomes your troubleshooting playbook when similar issues arise in production.” - Shipper-TMS [1]
Once live, focus on immediate monitoring and support to quickly address any production hiccups.
Post-Launch Monitoring and Support
Once the system is operational, visibility is key. Use dashboards to track critical metrics:
| Monitoring Metric | Why It Matters |
|---|---|
| API Availability | Confirms carrier endpoints are functioning properly. |
| Label Generation Latency | Helps avoid bottlenecks in warehouse operations. |
| Webhook Success Rate | Ensures tracking data flows seamlessly into your system. |
| Rate Shopping Accuracy | Verifies API quotes align with invoices within a 5% margin. |
Since carrier webhooks can fail more often than typical SaaS platforms [1], set up a backup polling system to check shipment statuses every 4 hours. Configure timeouts to 30 seconds for rate quotes and 60 seconds for label generation. Assign clear responsibilities for issue resolution and maintain direct contacts for carrier API support teams, such as FedEx Web Services or UPS API Support, to bypass general customer service [1].
Expanding and Improving the Integration Over Time
Shipping integrations are ongoing efforts. After a successful launch and with monitoring in place, focus on continuous updates to adapt to changing carrier APIs and business needs.
“Shipping integrations are not one-time projects. Carrier APIs change, credentials expire, label formats evolve, and new services are added or retired.” - Jordan Blake, Senior SEO Content Strategist, Orderbox [5]
Schedule monthly reviews with operations, support, and product teams to prioritize updates and identify carrier-side changes early [16]. Gather feedback from shipping and customer service teams to spot inefficiencies in daily workflows. As shipping volumes increase, consider adding more carriers or services. Tools like ShipPeek LTL TMS let you compare rates from over 14 LTL carriers in a single API request [7], simplifying the process of expanding shipping options. Small, focused teams can usually implement core tracking and API improvements within 4 to 8 weeks [16].
FAQs
What should I integrate first: rates, booking, or tracking?
Integrating rates first is a smart move before diving into booking or tracking. Why? Because accurate pricing and logistics details are the backbone of planning and managing costs effectively. Once rates are in place, the next step is booking - like creating a Bill of Lading. After that, tracking shipments becomes the final piece of the puzzle. This step-by-step approach ensures a smooth and efficient workflow.
How do I avoid bad weights, dimensions, and addresses breaking the API?
To keep your LTL API integration running smoothly, it's essential to focus on accurate and standardized data. Here's how you can ensure everything falls into place: - Double-check weights and dimensions: Make sure these details align with industry standards to avoid errors or unexpected charges. - Validate addresses: Use tools or databases to confirm addresses match postal standards. For example, always include nine-digit ZIP codes for U.S. locations. - Use proper SCAC codes: Ensure you're using the correct Standard Carrier Alpha Codes to identify carriers. - Standardize data formats: Stick to consistent formats like JSON or XML, depending on your system's requirements. - Implement error-checking systems: Build mechanisms to catch and fix errors before they impact API calls. By taking these steps, you can minimize disruptions and ensure a seamless integration experience.
What’s the safest way to handle OAuth 2.0 tokens and security logging?
To protect OAuth 2.0 tokens, it's important to prioritize secure storage to prevent any unauthorized access. Always use SSL for API requests to ensure data remains encrypted during transmission. Implement a strong token management strategy by rotating tokens periodically and keeping an eye on their usage to spot any potential misuse. For security logging, make sure to record key events like token issuance, usage, and invalidation. This creates a reliable audit trail, which can be invaluable for troubleshooting or conducting security reviews.